


pjfrix's guide to VHS capture
About a couple of years ago, I wrote an article roughly going through the process I go through about how I put digitally produced video onto VHS, an old home media format from way too damn long ago. At the time, I had made this article for the sole purpose of getting people to stop asking me about how I managed to do said effect for several pals who were utilizing the medium in their videos, courtesy of me, going through the process in a very simple, easy-to-learn manner utilizing the setup I had at the time.
Things have changed years later. I no longer use the same equipment I had prior, instead switching to a Panasonic PV-9451 (after my JVC suddenly died). I purchased a Panasonic DVD recorder to act as a 'time-base corrector’, correcting any unintentional distortion caused by my capture devices (more on that later). I've learned of better (although more tedious, depending on the method) ways of capturing analog video and deinterlacing using QTGMC, and I've had to replace my capture device (a Dazzle DVC-100) to a IO-DATA GV-USB2 because of an at-the-time recent Windows 10 update that caused the driver to choke every now and again (and even then, it can still be sort of finicky).
All of this, along with me feeling that the original article was way too focused on digital-to-analog video conversion, has made me consider updating this article into a more general-purpose VHS transfer tutorial for those who may be interested. Here we are, multiple years later, with such an up-to-date article.
Equipment
My VHS transfer workflow usually looks like this:
- VCR (video cassette recorder): Panasonic PV-9451.
- TBC (time base corrector): Panasonic DMR-ES15. Highly recommended.
- Capture device: IO-DATA GV-USB 2.
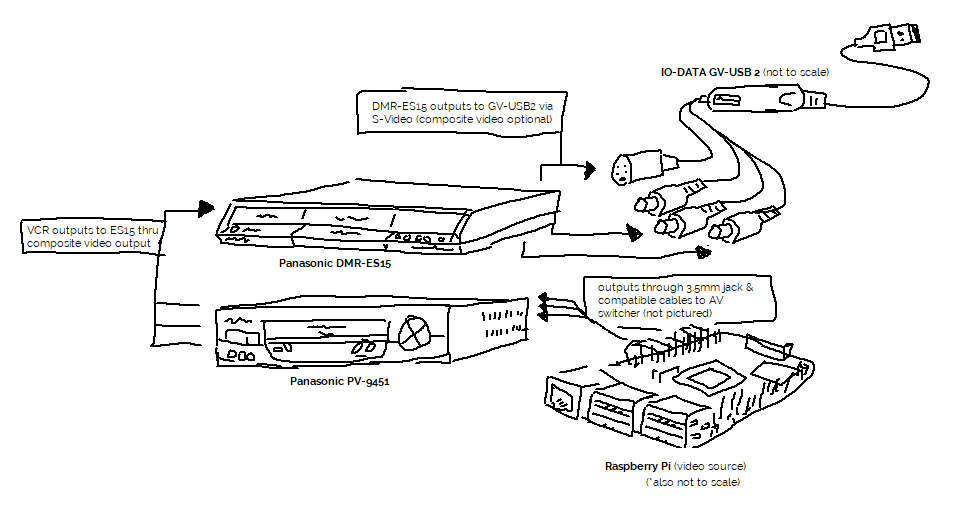
VCR hooked into the DVD recorder/time base corrector, hooked into my capture device. It's that simple. If I want to record something onto tape, then all I need to do is hook something up to the VCR through the composite video jacks on the back (or front, depending on its make or model.)
Of course, your setup doesn't always have exactly like mine (although I would still recommend the DMR-ES15 (time base corrector) regardless of VCR and capture device for reasons I'll explain later). As long as it functions the way it should, you're good to go.
The VCR
A general thing I would look for in a VCR are its capabilities and period of release. In my opinion, I find it best to pick a deck capable of doing Stereo/Hi-Fi audio and from the later portion of the 1990s into the early 2000s. You can find VCRs either locally or online (via eBay or somewhere similar.)
Every VCR is built differently, come from different manufacturers, and act differently from one another. My recommendations are typically as follows:
- JVC: Any of their professional/prosumer S-VHS decks. I previously had an HR-S3500U and it was fine.
- Panasonic: The AG-1980 is often regarded as the highest tier of VCRs, however most units go for a lot and often need lots of servicing. If you are unable to acquire one, I would recommend getting something from the Omnivision series. (in my case, the PV-9451.)
- RCA: Most of the units from the 1990s into the early 2000s. You can find quite a few more in this thread over on DigitalFAQs.
Depending on what you get, these units will probably need some form of servicing (especially in the case of some JVCs (often mode switch issues) and the Panasonic AG-1980 (often capacitor problems)). If you're purchasing online, it's best to find a VCR that functions, or shows pictures of it functioning.
As for things to avoid, I would strongly advise against any VCR manufactured by Funai. These are sold either by them or rebadged under Magnavox or other brands and are often reported to be of poor quality. Although they're typically common on places like Amazon and sometimes even in stores (often times going for upwards of $1k), I would strongly advise shifting your focus to what's been mentioned.
Tapes
Tapes can be found almost anywhere: locally or online. Most home recorded content lies on blank VHS tapes (often ‘sold as blank’). If you're planning to record onto VHS, I recommend picking up sealed blank tapes. These often come in packs and from experience aren't that hard to find, especially online.
When it comes to recording, I would strongly advise NOT recording over tapes with content already on them, or I guess unless they're readily available/commercially distributed tapes, but not even I would ever do that.
Time-Base Corrector
When direct capturing a VCR, it's expected to see a bunch of visual distortion, which may range from skewing at the top of output, blue screen during static or fast forwarding, making it hard to see what's going on, “banding”, and many more. What many people do to circumvent this is to add a 'time-base corrector’ to their capturing setup.
Some VCRs, in particular the AG-1980, already have their own way of correcting the video, however in most cases you're going to need an external device that corrects the signal. Most people, including I, recommend picking up a Panasonic DMR-ES15 DVD recorder. Like others, this goes in-between your VCR and your capture device and works well as a TBC.
If you don't get a remote with your unit, make sure to get the one that it's typically bundled with, the Panasonic EUR7659Y70. The Logitech Harmony should also suffice, however it's highly recommended to get the remote it comes with, as some features may require the original remote.
Once you get your hands on one, make sure to turn off Line-in NR. This can be done by pressing ‘Display’ on the remote (‘Info’ on the Harmony) and navigating to the ‘Video’ tab.
Capture devices
There are many types of capture devices online. It's best to get something that captures analog signals, typically Composite video and S-Video. In regards to physical peripheral cards, I would recommend the Hauppauge WinTV HVR-1280. For USB, either a IO-DATA GV-USB 2 or a Dazzle DVC-100 (recommended for older operating systems) should suffice.
In regards to “what to avoid,” Don't use an HDMI capture device (using an RCA-to-HDMI adapter) and do not use so-called “EasyCap” USB devices (for the same reason as to avoid Funai decks; poor quality).
As for driver availability, the latest drivers for the GV-USB2 can be acquired from IO-DATA's website (A driver CD is included if you buy it new in-the-box, however aren't typically up-to-date and might crash newer Windows 10 updates.) If you are having trouble obtaining it (as the link is in Japanese), refer to iotku's GV-USB2 English Setup Guide. The Dazzle DVC-100 drivers are available on the Internet Archive, directly sourced with the originally bundled DVD, however it seems that a semi-recent Windows 10 update seems to have ruined support for it, so you'll probably need to install try these drivers instead.
Otherwise, that should be about it in terms of equipment.
Production
I wrote this article initially to describe the process of getting digital video onto an analog format, so I might as well get that out of the way right now. Getting content onto VHS is not difficult. all you need is some form of input or source that outputs to composite or S-Video, with the latter being mostly exclusive with S-VHS (Super VHS) decks, along with your VCR and a blank VHS tape.
There are many ways of putting video through analog outputs:
- Converting the video to an interlaced MPEG-2 file, burning it onto a blank DVD and playing it back through a DVD player.
- Playing the video file through a media player on a separate device. My workflow takes advantage of option #2, so I'll discuss that here.
Since the first iteration, not much has changed:
- I have a Raspberry Pi hooked up through composite using the correct audio/video cables. Initially, I used an HDMI-to-RCA adapter, but later switched to composite as it natively supports it.
- I send the video(s) I want to transfer over the network via SFTP (secure file transfer protocol).
- I remotely connect to the computer through SSH and play the video either through a headless VLC instance or using OMXPlayer, which has been depricated as of the latest Raspbian releases.
The capturing process
My workflow previously consisted of using OBS Studio to capture and deinterlace. Though it may seem simple, not that many people recommend it for proper preservation. Instead, they recommend using VirtualDub2, a continuation of the linear editing program of the same name, minus the two, for capturing the video and QTGMC for deinterlacing.
(Note: Some people recommend using a separate PC for transferring VHS, however you shouldn't have issues with using your main computer. Just be careful.)
Capturing video with it is easy. After downloading and extracting it, launch and open the Device menu and click Capture AVI...
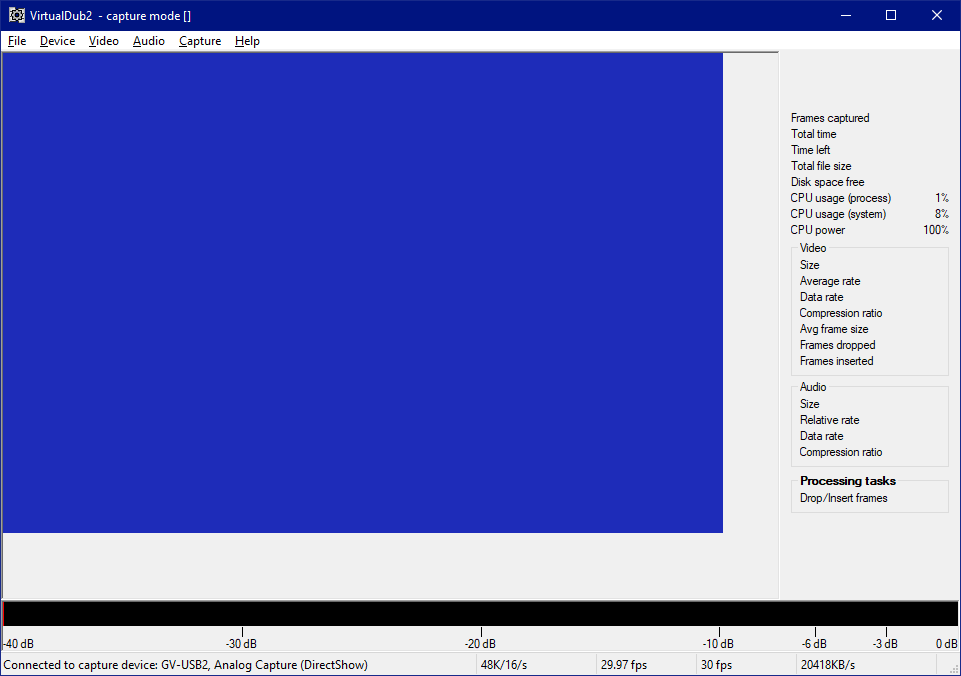
For optimal capturing, you'll need to make a few adjustments to the settings:
- Under the Video menu, set the Video Source to whatever input you're capturing. In my case, I have it set to S-Video. You might also need to change this setting under Capture filter or Crossbar.
- For video compression (press C), try to stick to (Uncompressed RGB/YCbCr). The only issue is that it takes up a lot more disk space (it is uncompressed, after all) and that QTGMC might not automatically work with it, so if you have problems, install the Ut Video Codec Suite and select UtVideo YUV420 BT.601 VCM (or similar) from the Video compression window.
- In Capture timing options, make sure ‘Drop frames when captured frames are too close together’ and ‘Insert null frames when captured frames are too far apart’ are checked, null frame burst limit is set to 10, resync is turned off, ‘Correct video timing...’ is unchecked and ‘Automatically disable resync...’ is checked, audio latency set to Automatic, with the number of audio blocks set to 30, and make sure ‘Force audio clock...’ is the only DirectShow option checked. [Sound confusing? Here's a picture.]
- In Disk I/O, set the chunk size to 4MB, chunks in buffer to 6, and disable Windows write buffering. Once everything has been set, I get everything ready, set the file path, and press F5 to record.
As VirtualDub is also a linear editing program, you can open your interlaced video, and just trim it through there. It does require saving another huge file, but it certainly saves some time.
Process of deinterlacing
Analog video is made up of interlaced frames, which consist of two different fields in sequence, one consisting of the odd lines and the other the even, typically consisting of 480/487 lines (NTSC) or 628 lines (PAL), often alternating between the two at around 29.97 or 25 fps depending on their respective regions. When displayed on a cathode-ray tube, these fields would be rapidly drawn one field at a time, resulting in smooth motion.
The capture device's output will almost always be interlaced and with a pixel resolution of 720px by 480px. If you want the combing gone, you're gonna have to deinterlace it. Although VirtualDub already comes bundled with multiple deinterlacing methods, a lot of people, including myself, recommend using QTGMC, which is quite a powerful deinterlacer for AviSynth, a powerful tool for editing and processing videos based around scripting.
Installation is fairly straightforward. All you really need is to install AviSynth+ and AvspMod (64-bit architecture recommended), then download and extract all of the necessary plugins into its plugins folder, of which you will need four: FFMPEGSource (optionally, LSMASHSource), FFTW3 (32-bit), and of course QTGMC.
Here's what a sample AviSynth+ script looks like featuring QTGMC:
SetFilterMTMode("QTGMC", 2)
FFmpegSource2("D:\virtualdub\pentiumIII_1.avi",atrack=1)
ConvertToYV12(interlaced=true)
AssumeTFF()
QTGMC(tr2=0, denoiser="dfttest", sourcematch=3, noiseprocess=2, noiserestore=1, preset="placebo")
BilinearResize(960,720)
Prefetch(10)
The “ConvertToYV12” line is optional if you chose the Ut Video codec a few steps ago.
Once you've written a script, you can process/render it through something like FFmpeg or VirtualDub2, leaving you with a properly deinterlaced file.
- An example FFmpeg command would be
ffmpeg -i input.avs -c:v libx264 -preset ultrafast -crf 18 -c:a aac -threads 10 output.mp4.
Using a frontend
As AviSynth is heavily script-based, it does require that you have some knowledge of the basics, how it works and whatnot. For those who prefer GUI applications over scripting or using the command-line,
Here, I'll be discussing two different frontends that allow you to deinterlace video using QTGMC (or interface with AviSynth in general):
- Hybrid, an advanced Qt-based frontend for various audio & video format converters and tools
- StaxRip, another powerful video/audio encoding GUI for Windows that interfaces with AviSynth+/Vapoursynth and various other utilities.
Using Hybrid
Hybrid is an advanced frontend for various audio and video format utilities. It's so advanced that even its creator admits it right on the front page:
Hybrid is intended for advanced users.
It's not intended to be a tool used by everyone. It's not intended to please amateurs who need a wizard-like interface. If you don't know the basics about containers, video formats, etc. Hybrid is not meant for you.
The majority of the steps are simplified from ENunn’s Hybrid tutorial, located here. If you are confused, go check out the original doc. That said, let's begin:
- Download and install Hybrid. I recommend having around 4 GB of disk space available, as the Windows installer is around 1 GB and extracts to 3.25 GB. Once installed, launch it. (the ‘Base’ tab should be default.)
- Load in your interlaced video, either by dragging onto the window or clicking Open File.
- Go to the Filtering tab. Check the Use box and select ‘QTGMC (Vapoursynth)’ (An option for Avisynth exists, but it operates mostly the same. If you experience issues, try switching to the other option.)
- Choose a preset. Slower presets will equal better quality.
- Check the Bob box if you want to de-interlace to 59.94/60fps. (Leaving this unchecked will de-interlace at 29.97/30fps.)
- Head into the Crop/Resize tab and
- Go back to the Basic tab and adjust the processing settings. ‘Video’ adjusts presets for video codecs. The default, x264, is fine. ‘Audio’ adjusts presets for audio. If left to ignore, then it will export without the audio track. passthrough all is recommended.
Using StaxRip
Like Hybrid, StaxRip is very advanced. The GitHub page recommends you know the basics before using it, found at its wiki. Here I will offer some basics:
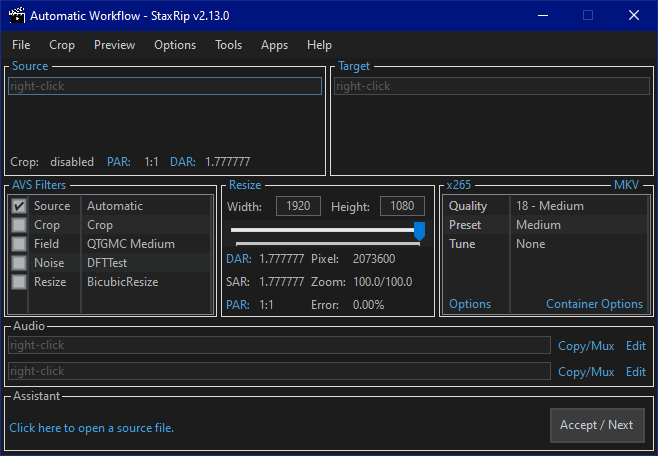
- Source will be where your input goes. Right-click and click Open... to load in your interlaced video.
- Target is where you will specify the output.
- AVS Filters will be where you set up AviSynth filters. Any boxes checked will enable the filter. Right-clicking will allow you to add a new filter. Double-clicking on any filter will pull up the Code Editor window, allowing you to edit them easier.
- Resize will be where you specify the output resolution. 1280x960 should do.
- Your encoding options are specified on the lower-rightmost box. The first field will specify the encoding profile, while the second specifies the output container.
- Audio is where you specify audio tracks.
- Assistant is an assistant of sorts, hence the name. An even more extensive tutorial can be found at its GitHub.
Conclusion
If you've followed all of the steps correctly, you should be left with a properly deinterlaced, authentic VHS transfer. If I missed something, or wrote something incorrectly, be sure to let me know (somewhere. i still don't have a proper way to get into contact yet) and I'll be sure to update it whenever I get the time.

