This guide teaches you how to install the software within DOSBox-X, a fork of DOSBox that is more appropriate for a program like this.
VGA.SYS display driver included with Windows Server 2003 and XP.Windows 95 requires additional configuration to run properly in DOSBox. Open up the dosbox(-x).conf file with your text editor and add/replace these options:
[sdl]
autolock=true

[dosbox]
title=PC Prevue
memsize=128

[video]
vmemsize=8

[cpu]
cputype=pentium_mmx

[autoexec]
ver set 7.1
If you are using vanilla DOSBox, you'll need to change the cputype to pentium as the former is exclusive to DOSBox-X.
Windows 95 will not run properly unless run on a VHD (virtual hard disk.) Previously, I used PCem to create a hard drive image, however since publishing I have found out there are much better and versatile methods of creating a virtual disk image.
Like with the previous iteration of this guide, 400 MB will be my preference for disk size.
Since DOSBox-X version 0.83.9, it is possible to create a hard disk image directly from the UI. You can find this option under the ‘DOS’ menu.
IMGMAKE is a command prebundled with DOSBox-X. It can be accessed once you reach the virtual DOS environment.
IMGMAKE hdd.img -t hd -size 400 -fat 32
This command builds a disk with a filesize of 400 MB and formats it as FAT32.
qemu-img, a command-line utility bundled with QEMU:dd (Unix):There are several ways of getting files onto a virtual machine.
Download and extract to a folder of your choosing, then run DISKEDIT. A dialog box should appear. Navigate to the folder containing your newly created disk image and select “(Manual HD)” as the profile when prompted.
By default, nothing should appear. At the bottom of the window, under Format, select ‘ATFormat’ in the dropdown, Basic partition...’ from the list, then click OK.
Place all of the files you want to transfer into a folder, then mount the folder within DOSBox. You can either do this in the menus or in the virtual DOS environment:
mount E <folder location>
This command can also go under the [autoexec] portion of your configuration.
Mounting an ISO image is pretty straight forward:
IMGMOUNT D OSR2.iso
(This assumes your ISO is named OSR2 and included in the same directory as DOSBox-X.)
Likewise, you can also directly mount the disk image in the menus.
Proceed to install Windows 95 as you probably would on actual hardware.
When everything is done, you should now be at the Windows desktop.
Follow the instructions here.
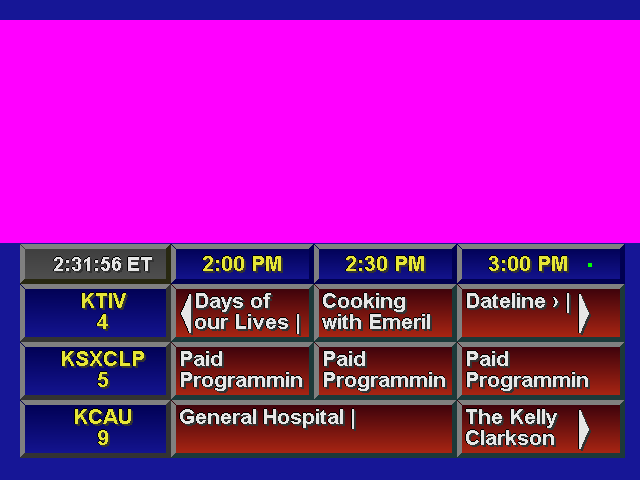
To receive the listings, open up the DOSBox configuration and go to the [serial] field (add it if it does not exist), then look for a line starting with ‘serial2=dummy’ and change dummy to nullmodem port:1234. After this, reopen DOSBox. You might get a pop-up from Windows Firewall. If so, make sure both boxes are checked (or checked depending on whatever your Wi-Fi/ethernet connection is set to ‘home/private’ or ‘public’). DOSBox should now be listening for TCP/IP connections on port 1234.
Once Windows starts up, reopen PC Prevue and wait for it to get to the Guide, then on your main OS open up a command prompt, navigate to the PrevueCLI directory, and enter the following command:
If you are using vanilla DOSBox, you can verify that listings are being sent correctly in the DOSBox Status Window, which should mention that a client has connected. Shortly after that, you should see the listings appear one by one in the window.
NOTE: If your ListingsCommand is set up properly, the vertical lines should not appear within the listings. If so, then make sure to set omitSpecialCharacters to true.
